Bought a new bridge rectifier (£6) from RS and some thermal paste. Soldered the new rectifier in and all working again
3 Likes
I’m keen to build this project - but the specific boards recommended earlier in the thread are ‘currently unavailable’ from Amazon. Which are the current known good ones to get please? Best regards Tim
2 Likes
I’m keen to build this project - but the specific boards recommended in the thread are ‘currently unavailable’ from Amazon. Which are the current known good ones to get please? Best regards and thanks Tim
2 Likes
I have listed the ones I used - and worked, if they are no longer available then someone else will need to suggest one - or for the money they cost just give one a go.
3 Likes
Appreciated thank you
2 Likes
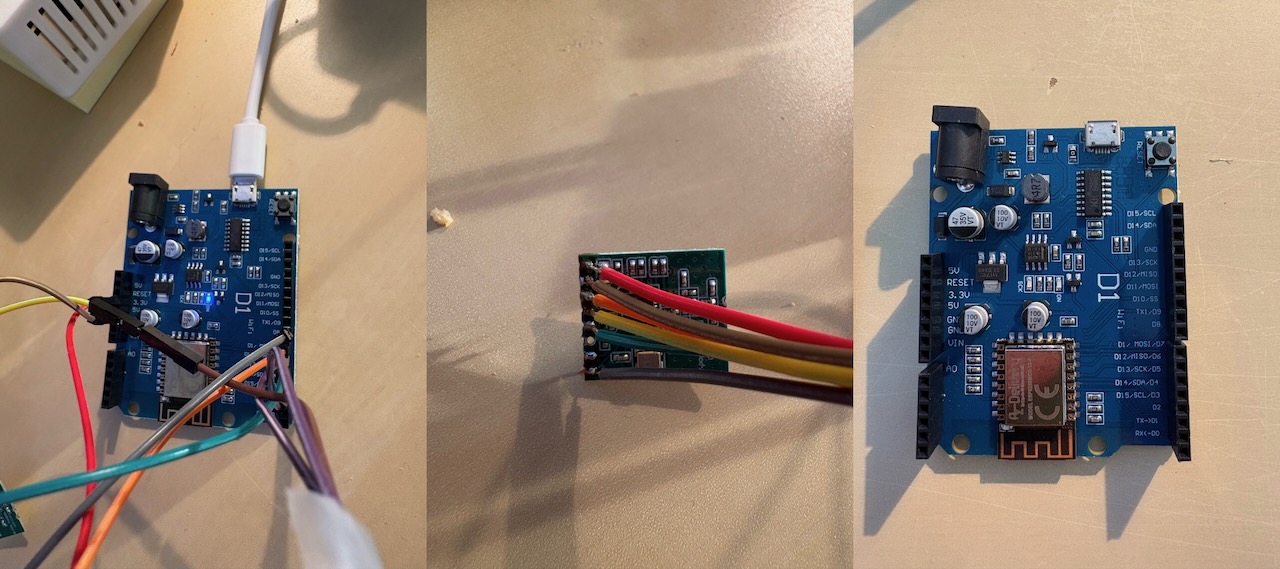
Hi again - I ordered some boards, wired them up, and tried to follow the Home Assistant set up from GitHub - but I’m stuck. The d1 board installs fine with the standard yaml - but the project sends the wifi connection into a loop. In HA I don’t get the new sensors. Yaml and board pics attached. The Dupont sockets on the d1 don’t quite line up with the labels but I think I’ve used the right ones. You’re right that soldering on the small board was tricky. I haven’t attached the aerial yet. I changed the yaml to give it a static IP and added the wifi credential to secrets. Now I’m stuck. Any pointers on troubleshooting please? Best regards Tim
esphome:
name: cc1101
libraries:
- SPI
esp8266:
board: d1_mini
framework:
version: latest
external_components:
- source:
type: git
url: GitHub - JNSwanson/ESP-Home-iBoost: ESPHOME Marlec iboost integration
#type: local # Alternative. Clone from git and point to the local files:
#path: “C:\Users\\iboostSrc\ESP-Home-iBoost\esphome\components”
components:- cc1101
- iboost
cc1101:
text_sensor:
Enable logging
logger:
Enable Home Assistant API
api:
password: “”
ota:
- platform: esphome
password: “”
wifi:
ssid: !secret wifi_ssid
password: !secret wifi_password
manual_ip:
static_ip: 192.168.1.23
gateway: 192.168.1.1
subnet: 255.255.255.0
Enable fallback hotspot (captive portal) in case wifi connection fails
Optional MQTT support
#mqtt:
topic_prefix: “iBoost”
discovery: false
broker: !secret mqtt_broker_ipaddress
port: 1883
username: !secret mqtt_user
password: !secret mqtt_password
discovery_prefix: homeassistant
Optional Web configuration entry
web_server:
port: 80
version: 1
captive_portal:
sensor:
-
platform: iboost
id: iboost_iboost_idheating_import:
name: “iBoost Import”
unit_of_measurement: “W”
accuracy_decimals: 0
icon: “mdi:solar-power”heating_power:
name: “iBoost Power”
unit_of_measurement: “W”
accuracy_decimals: 0
icon: “mdi:solar-power”
device_class: powerheating_today:
name: “iBoost Today”
unit_of_measurement: “Wh”
accuracy_decimals: 0
device_class: energy
icon: “mdi:solar-power”
state_class: total_increasingheating_yesterday:
name: “iBoost Yesterday”
unit_of_measurement: “Wh”
accuracy_decimals: 0
icon: “mdi:solar-power”
device_class: energy
state_class: total_increasingheating_last_7:
name: “iBoost Last 7 Days”
unit_of_measurement: “Wh”
accuracy_decimals: 0
icon: “mdi:solar-power”
state_class: total_increasing
device_class: energyheating_last_28:
name: “iBoost Last 28 Days”
unit_of_measurement: “Wh”
accuracy_decimals: 0
icon: “mdi:solar-power”
device_class: energy
state_class: total_increasingheating_last_gt:
name: “iBoost Total”
unit_of_measurement: “Wh”
accuracy_decimals: 0
icon: “mdi:solar-power”
device_class: energy
state_class: total_increasingheating_boost_time:
name: “iBoost Boost Time Remaining”
unit_of_measurement: “Min”
accuracy_decimals: 0
device_class: duration
icon: “mdi:solar-power”
Ensure text_sensor: is at the correct level
#text_sensor:
- platform: cc1101
- platform: iboost
heating_mode:
  name: "iBoost Mode"
  icon: "mdi:solar-power"

heating_warn:
  name: "iBoost Warn"
  icon: "mdi:solar-power"
button:
-
platform: template
name: “iBoost Manual Boost START”
id: BoostStart
icon: “mdi:solar-power”
on_press:
then:
- lambda: |-
id(iboost_iboost_id)->boost(id(boostTime).state); -
platform: template
name: “iBoost Manual Boost CANCEL”
id: BoostCancel
icon: “mdi:solar-power”
on_press:
then:
- lambda: |-
id(iboost_iboost_id)->boost(0);
number:
- platform : template
name: “iBoost Manual Boost Time”
id: boostTime
icon: “mdi:solar-power”
unit_of_measurement: “Minutes”
optimistic: true
initial_value: 15
min_value: 0
max_value: 120
step: 15
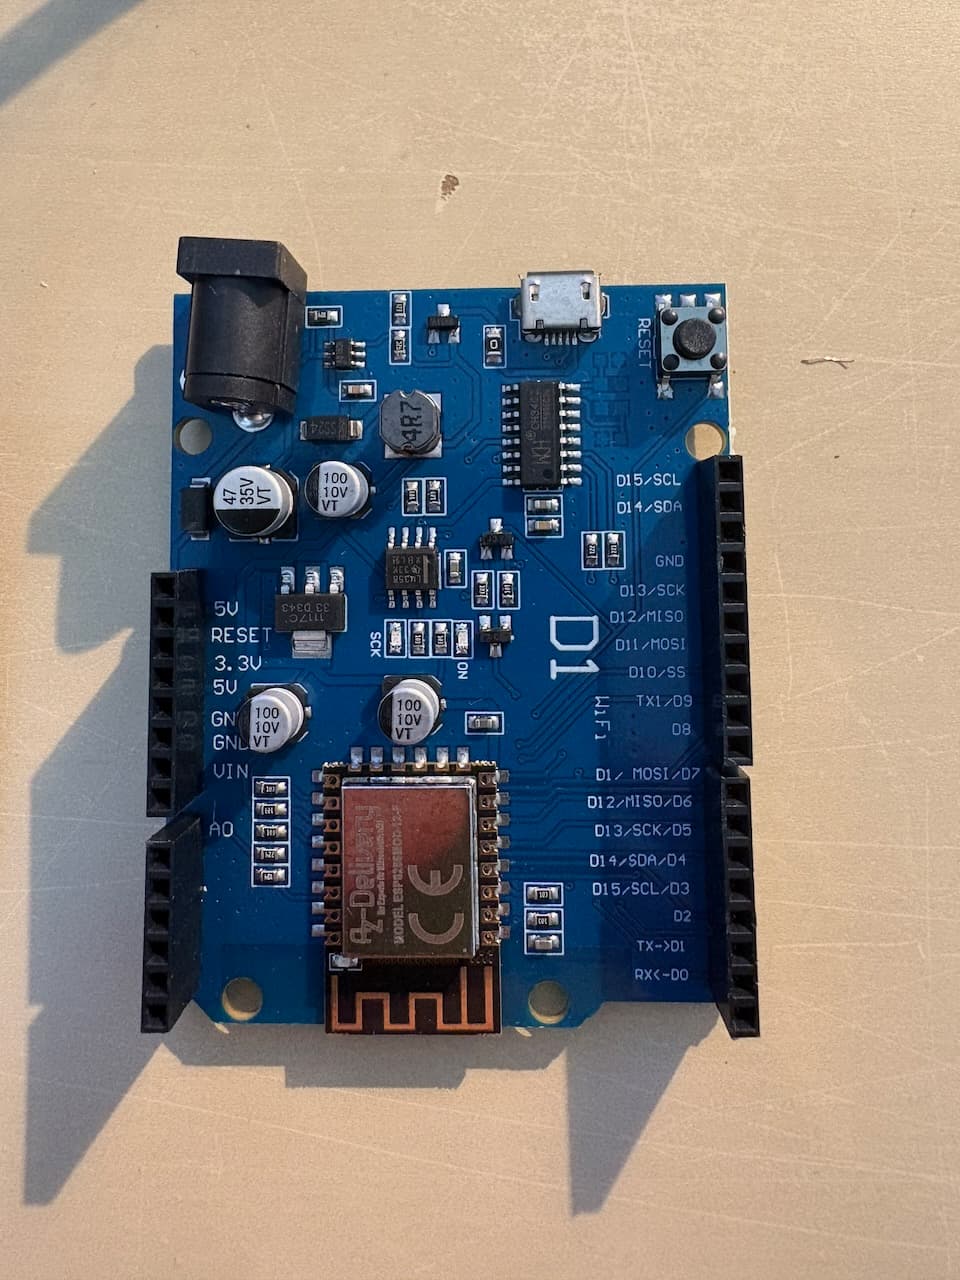
wiring pics to follow
1 Like
if you connect direct to the board - what part of the boot-up is it getting to ?
Also when is it discovered in HA - and you use the standard .YAML can you post that config as well - as it might be the board model is using the wrong drivers etc…
But for me the only time I got a boot loop was when I did the wiring incorrect.
So lets see the wiring picture of both boards connected
1 Like
Hi thank you for this - I think you’re right about wiring. With small board attached I get the same boot loop/radio reset with the default yaml:
esphome:
name: cc1101
friendly_name: cc1101
esp8266:
board: esp01_1m
Enable logging
logger:
Enable Home Assistant API
api:
encryption:
key: “lgyqLJAy9Qj60R6A7U82iz7WXt7GNR1kEvt/KAeE+O0=”
ota:
- platform: esphome
password: “5205193c5a6211ec89534d5eaeecd56e”
wifi:
ssid: !secret wifi_ssid
password: !secret wifi_password
Enable fallback hotspot (captive portal) in case wifi connection fails
ap:
ssid: “Cc1101 Fallback Hotspot”
password: “63QZGO2O8ckf”
captive_portal:
I’ve combined images due to forum limitations
1 Like
I cannot see the wires that should be crossed connected ( the red ones on my photo ) (D6 and D2 both go to the MISO on the CC1101 )
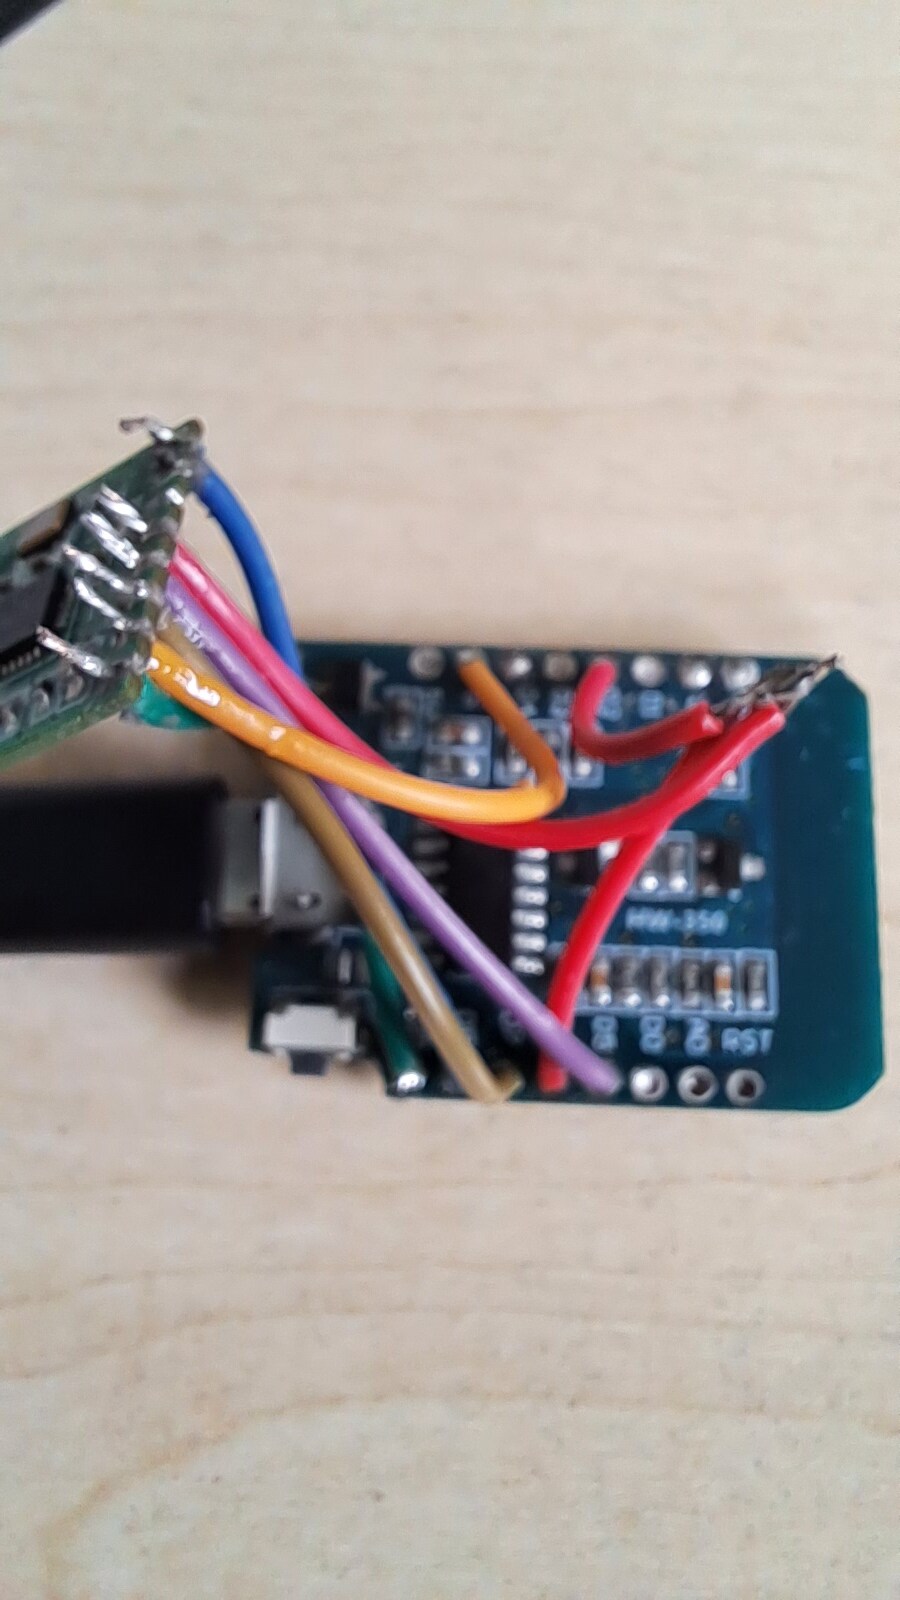
Re-check all your wiring - i think you have the wired into the CC1101 wrong
1 Like
Thank you re-checking now - yellow from small board is linked to two pins on the larger one. My problem may be the sockets not lining up with the labels.
1 Like
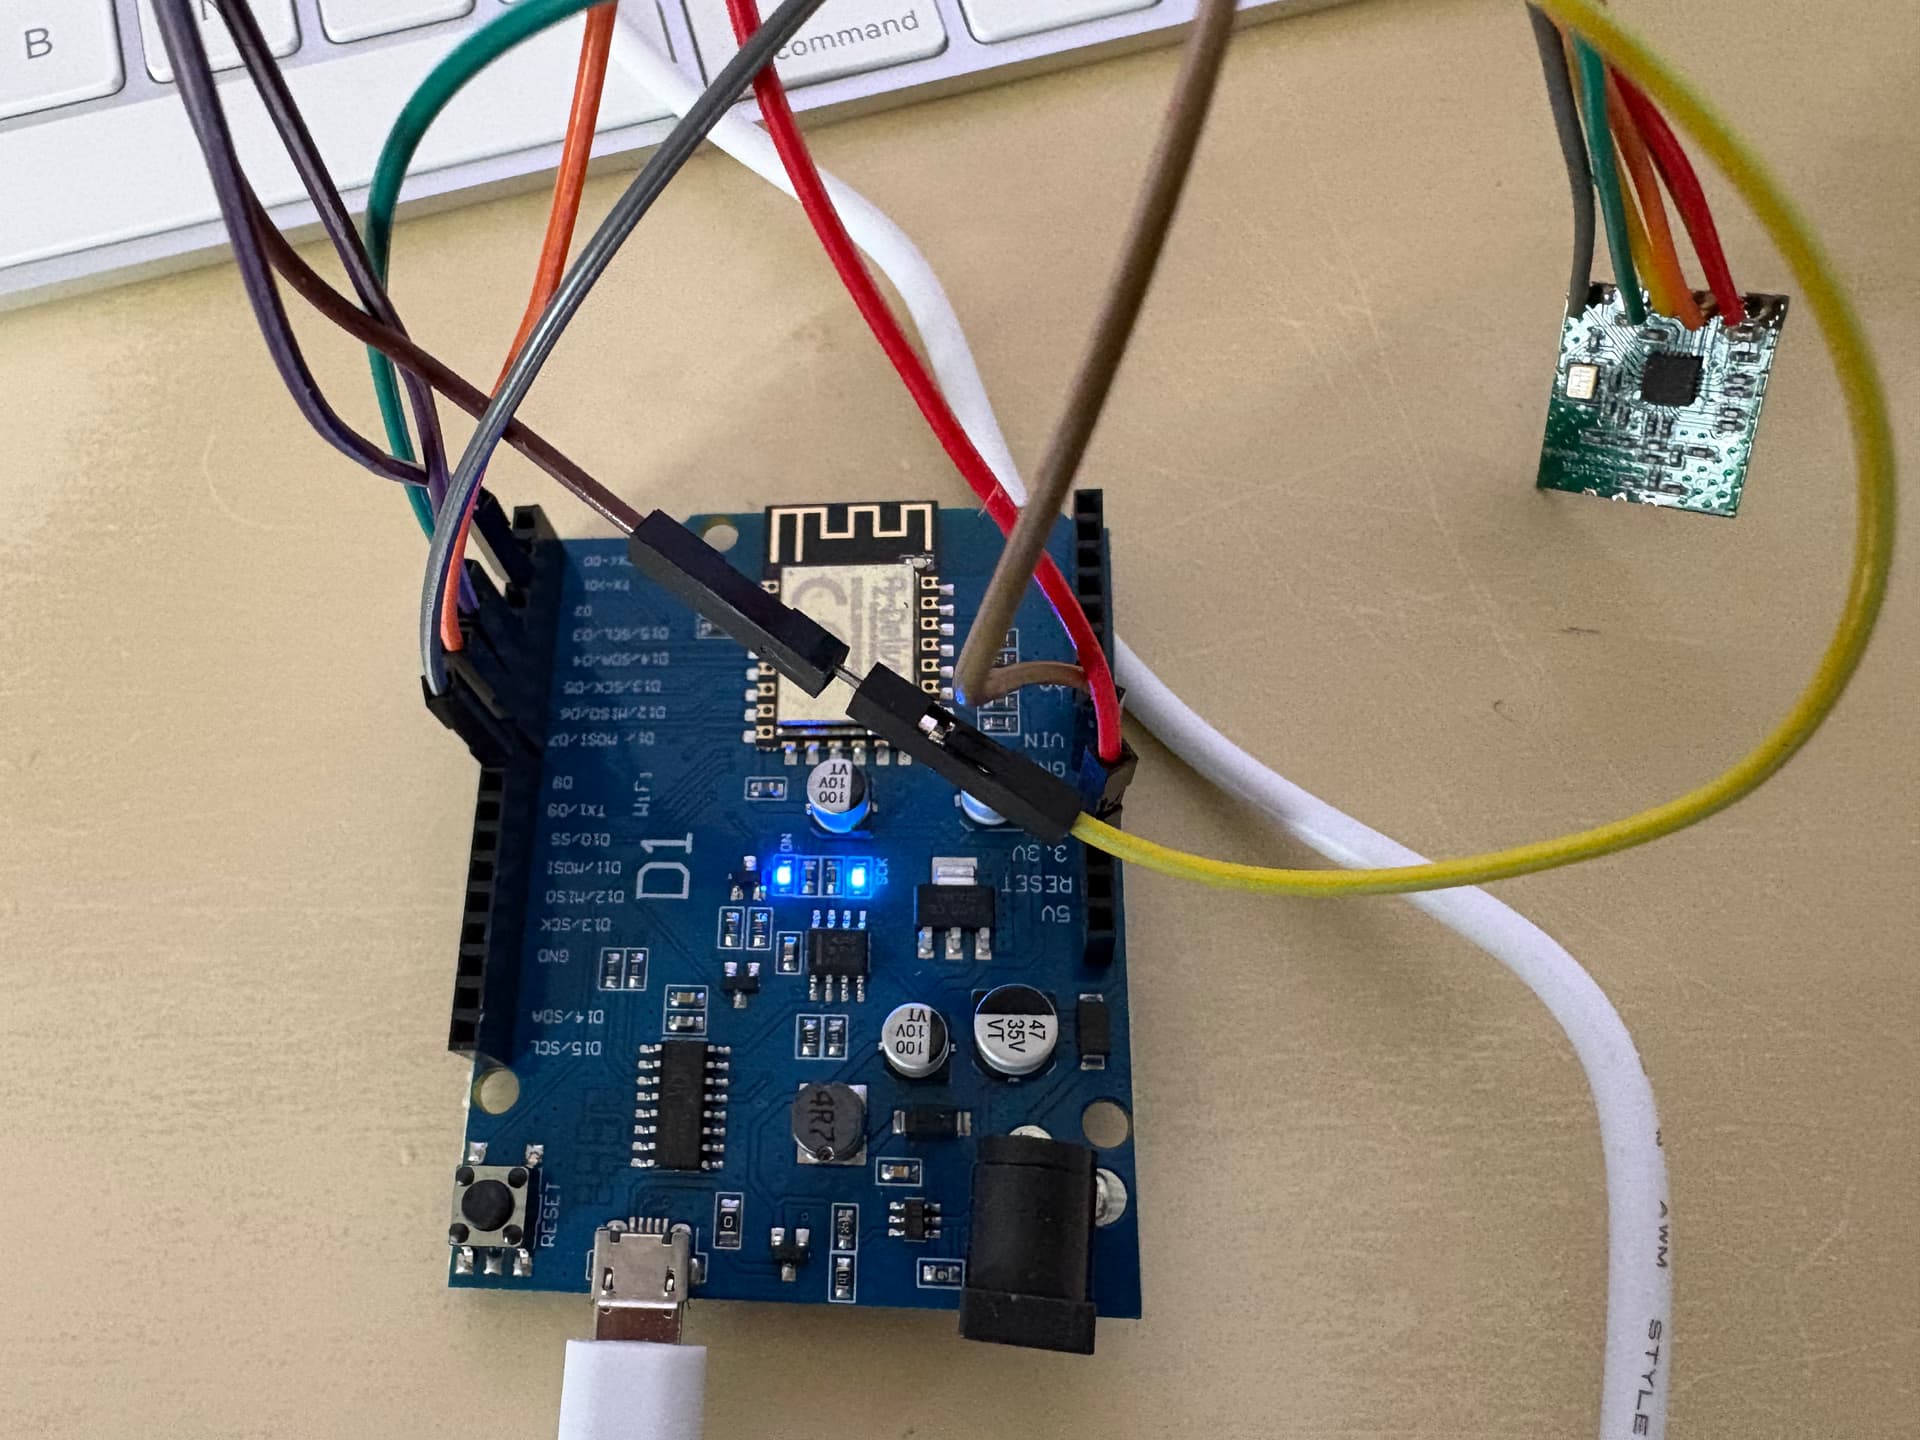
if yours is a clone board… maybe the pin out is not quiet aligned ?
the D2 looks different here ?
Good luck.
1 Like
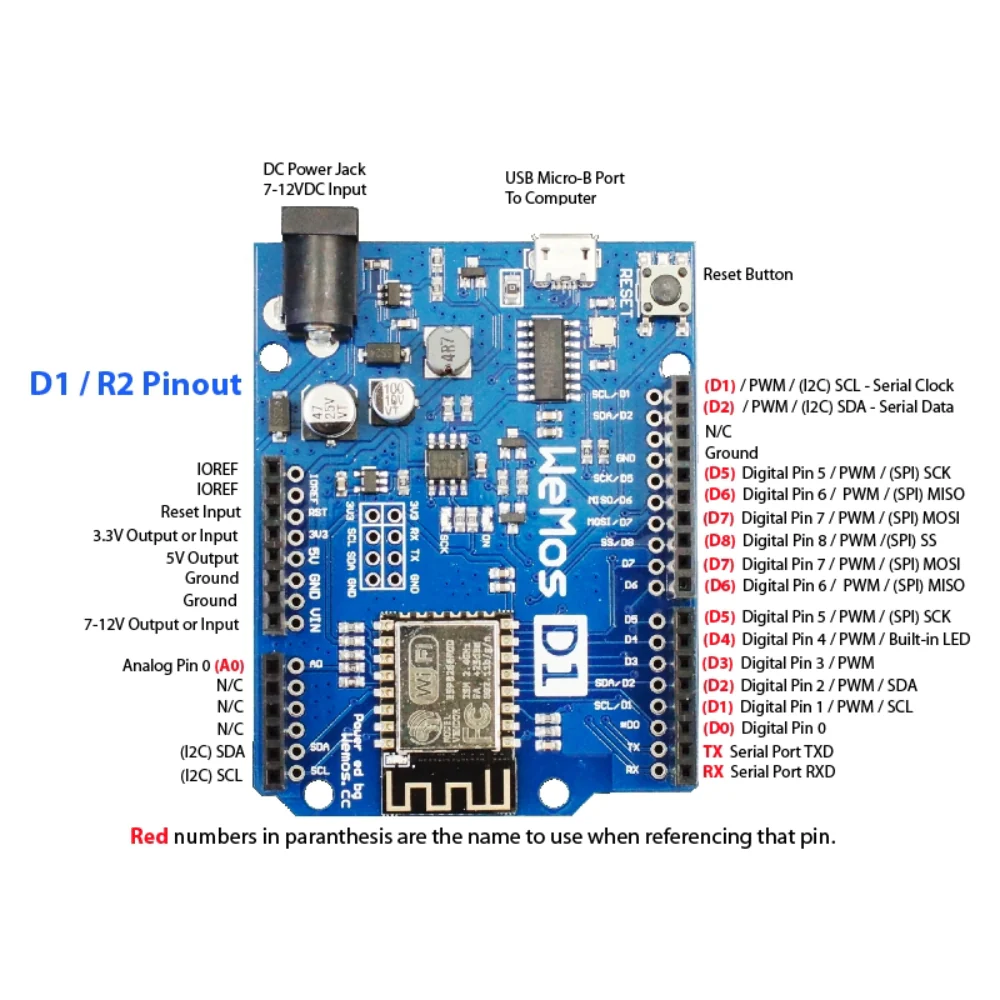
Thank you - found the AZ_delivery board pin diagram pdf and am resetting everything and starting again https://cdn.shopify.com/s/files/1/1509/1638/files/AZ276_A20-13_EN_B08BTYX1WL.pdf?v=1721128536
1 Like
Things are looking more promising but when adding to Home Assistant I keep getting the error “Unable to connect to the ESPHome device. Make sure the device’s YAML configuration includes an api section.”
The original GitHub yaml had this (that didn’t work):
Enable Home Assistant API
api:
password: “”
I tried adding a key - and that didn’t work either.
Enable Home Assistant API
api:
encryption:
key: “O0UF4lC+BAJKRnD8QRLKbIZLyB86KoFGeUSBxSZOGfU=”
Where am I going wrong please?
1 Like
I was really pleased that I found this, as I was thinking about using a SwitchBot Bot, but wasn’t happy about that, as there would be no feedback on the setting and what was successful, other than using a camera, which made it silly!
Built this with £3.15 worth of parts from AliExpress ![]()
Took about 2 hours assembling etc but it all works fine, with a really good range too.
A bit of a delay sometimes (Up to 60 seconds) from pressing the Boost in Home Assistant to the IBoost actually kicking in, but it all works and I now have much more control when I am out of the house, as it seems to be always then when Octopus have the free 1 or 2 hours!!!
I have a in-line setup to remotely control turning the iBoost on and off too, so that I can turn it off when on holiday/away, and turn it on remotely a day or 2 before I return, so that I have hot water.
2 Likes
This looks very interesting. Can I ask if there is a Shelly device that would do the same thing instead of these boards, soldering and writing scrips please? Guessing the answer is NO but thought I would ask, just incase?
I dont believe so, as this is a very bespoke project, which really works well
1 Like
Thank you for the reply, not sure I am technical enough to attempt this, but it was very interesting as I said. I will have a look back at the posts again and see if I have any further questions.
Yes, it’s one of those things where if it goes well, then it’s easy, but you can have a lot of problems getting the ESP connecting to WiFi and there are loads of articles about it on line, but there doesn’t seem to be any reliable ‘fix’! Some say change the power to 8.5dB, but this doesn’t always work ![]() Some report the ESP just works again one day!!
Some report the ESP just works again one day!!
I am struggling with this currently having done the first one without any problems and it is incredibly frustrating not having a solution to the second one all in its 3D printed case ![]()
1 Like
Thank you for the extra advice. I am halfway through reading this post again, no questions at the moment.
Wow 99 posts quite a good subject then ![]() .
.
Place your bets who’s going to be number 100 ![]()
Oh go on then I will tick the box to get your post to 100.
Have a great Christmas Everyone ![]()